

In my last article “From Continuous Integration to Continuous Delivery” I covered the topics of Continuous Integration and Continuous Delivery. In this article I continue on that theme: I will show how a Java application can be turned into a so-called Application Bundle under Mac OS X. As an Application Bundle, a Java application behaves like a normal native Mac OS X application. Creating an Application Bundle therefore represents an essential step in a deployment pipeline that should be carried out before the software is shipped.
Native Mac OS X applications are more than just a simple executable file, even though a user only ever sees a single icon in the Finder. Under Mac OS X, an application consists of a directory structure that contains both the executable files and the other resources an application needs. This directory structure is called an Application Bundle, and the structure of an Application Bundle is precisely defined by Apple. Such an Application Bundle simplifies delivery for the developer and hides the application’s internals from the user. An Application Bundle can be installed very easily by the user via drag ‘n’ drop, which greatly improves an application’s portability.
Directory structure of an Application Bundle
The actual directory structure of an Application Bundle is hidden in the Finder as soon as a directory is given the .app suffix. Besides the suffix, there is an additional attribute, the so-called Bundle Bit, which is set on a directory. The combination of the suffix and the Bundle Bit turns a directory into an Application Bundle. The precise structure of an Application Bundle is shown in Figure 1.
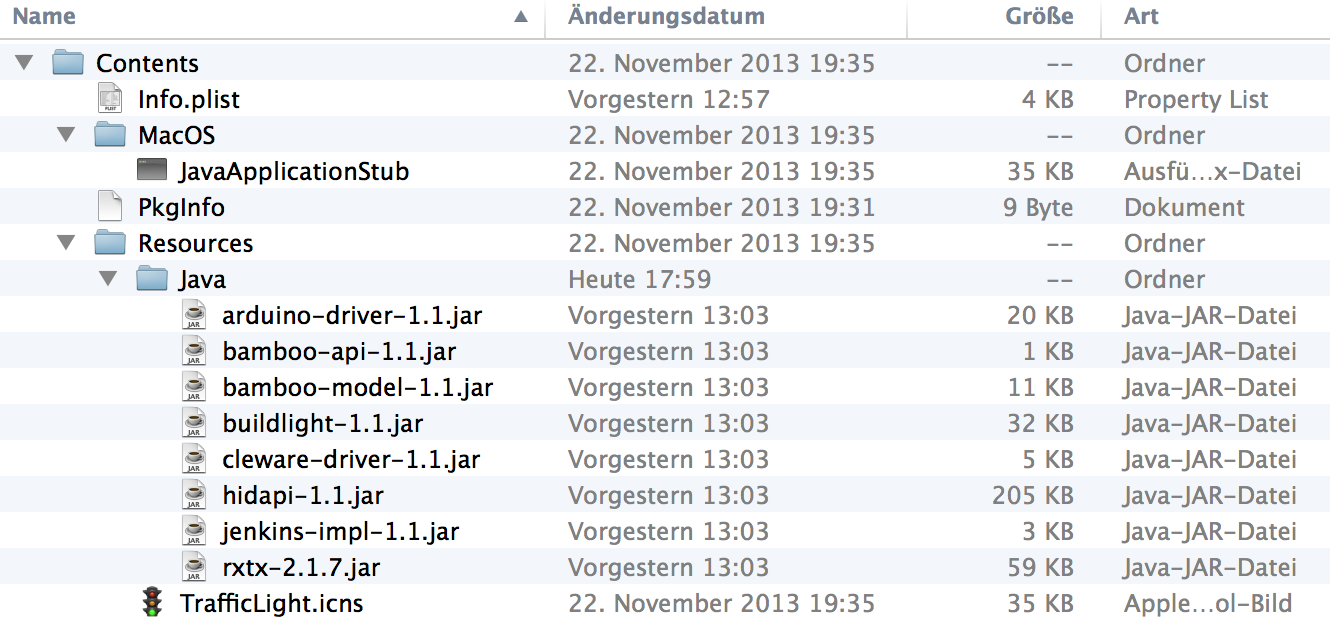
A Java Application Bundle contains the following directories and files:
- An Info.plist file in the Contents directory, which contains important metadata used by Mac OS X. (“Java Dictionary Info.plist Keys”)
- In addition, a file named PkgInfo should be included in the Contents directory. This file is a simple text file containing the string APPL followed by either four letters or four question marks. (“Data Type Registration”)
- The icons shown in the Dock and in the Finder are located in the Resources directory.
- The Java code is also stored in the Resources directory, inside the Java subdirectory.
- The MacOS directory contains the so-called JavaApplicationStub, a native application that boots up the JVM.
Gradle Build
Most Java projects have a build system that automates the building of the software and thereby simplifies setting up an automated deployment pipeline. A very popular build system is Gradle, which many open source projects now use (Spring and Hibernate). Gradle is a build system that uses a Groovy-based Domain Specific Language (DSL) to describe projects. As a result, Gradle scripts are also directly executable code.
Gradle was designed for builds consisting of a large number of projects, following the fundamental philosophy that a build system should offer the user sensible defaults based on common conventions while leaving as much freedom as possible. In addition, the user should be able to override such defaults in order to accommodate project-specific peculiarities. Gradle’s concept is thus intended to bring together the flexibility of Ant with the “build-by-convention” strategy of Maven.
Just how flexible Gradle is can be seen in the following listing. The listing shows the build script of a Gradle plugin, which is described in more detail further below. Gradle’s build concept adopts the standard conventions introduced by Maven (“convention over configuration”) for a project’s directory structure (Figure 2). As you can see in the build script, you don’t have to explicitly specify the directories where the source code resides in order to build the plugin — instead, it simply uses the src/main/groovy directory, as prescribed by the Maven conventions.
apply plugin: 'groovy'
apply plugin: 'idea'

repositories {
    mavenCentral()
}

dependencies {
    compile gradleApi()
    compile localGroovy()
}

task compileJavaAppLuncher(type: Exec) {
    def javaAppLuncherDir = "${buildDir}/resources/main/com/github/zutherb/gradle/mapAppBundle"
    mkdir javaAppLuncherDir
    executable  "gcc"
    args        "-I", "/Library/Java/JavaVirtualMachines/jdk1.7.0_45.jdk/Contents/Home/include",
                "-I", "/Library/Java/JavaVirtualMachines/jdk1.7.0_45.jdk/Contents/Home/include/darwin",
                "-o", "${javaAppLuncherDir}/JavaAppLauncher",
                "-framework", "Cocoa",
                "-arch", "x86_64",
                "-isysroot", "/Applications/Xcode.app/Contents/Developer/Platforms/MacOSX.platform/Developer/SDKs/MacOSX10.9.sdk",
                "-mmacosx-version-min=10.7",
                "${projectDir}/src/main/object-c/main.m",
                "-v"
}

tasks.processResources.dependsOn(compileJavaAppLuncher)

Gradle consists of an abstract core and a large number of plugins. Even the implementation of the Java build is itself based on a Java plugin. With this architecture, Gradle gains the ability to handle build processes for arbitrary software platforms, and it gives the user the ability to teach the tool their “unconventional” ideas. Gradle ships out of the box with a number of plugins that can build not only Java but also Groovy, Scala, and even C++ projects.
Unfortunately, Gradle does not come with a built-in plugin for packaging Mac OS X applications, even though Gradle has a very good Application Plugin that packages an application for Windows and Linux.
Creating an Application Bundle with Gradle
To create an Application Bundle with Gradle, there’s the project: gradle-macappbundle. It works analogously to the Gradle Application Plugin. Only the MainClassName needs to be configured, and then the plugin creates the directory structure described above. The plugin even packages the application afterwards into a dmg file. This MacAppBundle plugin works really well, but unfortunately the JavaApplicationStub only supports Java 6. Java 7 programs unfortunately cannot be opened with the JavaApplicationStub, which is a real shame if you want to use a newer Java version. In addition, the JRE is not bundled into the application, which can cause problems especially with newer Java versions, since Apple no longer ships Java with macOS.
In my search for an alternative I found one at Oracle. Oracle’s AppBundler task has a JavaApplicationStub — called JavaAppLauncher in this project — that can be used with Java 7/8. The JavaAppLauncher is a simple Objective-C program that boots a JVM via JNI while evaluating the Info.plist file. In addition, the JRE is copied into the application, which ensures that the Java application always runs under OS X, even if Java is not installed on the machine. In principle, it’s possible within a Gradle script to reach into an Ant script, but Oracle doesn’t follow the conventions that Apple propagates when it comes to packaging. That’s why I decided to combine these two projects and build my own plugin based on them.
The source code of my plugin is available in my GitHub repository and its usage doesn’t differ from gradle-macappbundle. It provides the following nine tasks:
- configMacApp – configures the default values for the plugin
- generatePlist – generates the Info.plist file
- generatePkgInfo – generates the PkgInfo file
- copyToResourcesJava – copies the jars into the .app directory
- copyJavaAppLauncher – copies the JavaAppLauncher, used to start Java, into the .app directory
- copyJavaRuntime – copies the JRE into the .app directory
- runSetFile – runs the SetFile command, which sets the Bundle Bit
- createApp – aggregator task for tasks 9/10
- codeSign – creates the digital signature for the application
- createDmg – creates the .dmg file that contains the .app directory
This means the plugin provides the full functionality of both the gradle-macappbundle plugin and the Oracle AppBundler task. To use it, you simply need to put the jar on the build script’s classpath and add the plugin to the build script. The following listing shows how to use the plugin in your own build script.
apply plugin: 'macAppBundle'

macAppBundle {
    mainClassName = "com.example.myApp.Start"
    icon = "myIcon.icns"
}

buildscript {
    repositories {
        mavenCentral()
    }
    dependencies {
        classpath 'com.github.zutherb.gradle:gradle-macappbundle:0.1'
    }
}
Once you have configured the plugin accordingly, Gradle will automatically use it whenever you build the project with the build task. In other words, every build automatically produces a dmg file containing the complete Application Bundle.
Have fun with it.
Retrospective (2026)
Looking back, hand-rolling a Gradle plugin to glue together Objective-C launchers and JRE bundling feels like a product of its moment — a few years later Apple pushed everyone toward jpackage and notarization requirements that made most of this plumbing obsolete. Still, the underlying instinct was right: treat packaging as a first-class, automated step in the delivery pipeline rather than a manual afterthought, and that principle has only grown more important. These days my attention has shifted from packaging native binaries to packaging and orchestrating autonomous AI agents, but the problem shape rhymes — defining clean contracts between a runtime, its dependencies, and the host environment, then automating every hand-off so nothing ships by accident. If I were tackling this today, I’d spend the effort not on an Objective-C stub but on making an agent pipeline just as deterministic and self-describing as that old Info.plist was meant to be.